This article refers to the address: http://
0 PrefaceAt present, image acquisition devices with CCD technology as the core can be divided into two categories:
1) an image acquisition system consisting of a CCD camera, an image acquisition card and a computer, using an image acquisition card to convert the analog image signal transmitted from the CCD into a digital image signal and transmitting it to a computer for processing;
2) The digital image signal is directly transmitted to the computer through the port by the digital device provided by the CCD camera itself.
The former as a classic image acquisition system has always dominated the application of image acquisition [1], but the acquisition card with better performance is expensive, and because of the different needs, it is often necessary to carry out secondary development of the acquisition card, and most of them The capture card manufacturer encapsulates its own functions and link libraries, so the professional quality of the developers is high during the secondary development. In recent years, with the continuous advancement of CCD camera technology, the second type of image acquisition equipment represented by digital cameras has attracted wide attention due to its convenience, speed, high resolution, high cost performance, etc., and has been in some fields. Made a good application.
For the second type of image acquisition device, since the CCD camera directly provides a digital signal, a high-quality image can be obtained, but at the same time, a high requirement is also imposed on the transmission rate of the image data. The general CCD output can follow the digital output interface standards such as RS-422, RS-644 and IEEE1394. Among them, RS-422 data transmission rate is relatively low, can not meet the requirements of a large number of image data transmission; and RS-644 must add an image acquisition card when transmitting data, which increases the cost of the entire system. IEEE1394 not only provides high-speed data rate, but also overcomes the shortcomings of RS-422 data transmission rate. At the same time, it does not need to add an image acquisition card when connected to CCD [2].
IEEE1394, also known as FireWire, is a high-speed serial bus standard released by Apple in 1987. The standard was adopted by the Institute of Electrical and Electronics Engineers (IEEE) in 1995 and is called IEEE1394. In 1995, IEEE1394-1995 had a data transmission rate of 100/200/400 Mbps, and later its improved version of IEEE1394b had a data transmission rate of 800 Mbps. , 1.6Gbps and 3.2Gbps. Therefore, the IEEE1394 bus is by far the fastest serial bus [3]. The IEEE1394 bus has the following features: (1) Digital interface: Data is transmitted in digital form without digital-to-analog conversion, thereby reducing the complexity of the device and ensuring the quality of the signal; (2) Plug and Play; (3) Speed Fast, support synchronous and asynchronous data transmission mode; (4) physical size is small, low manufacturing cost, easy to install; (5) cheap. Based on these characteristics, 1394 is widely used in the field of multimedia, especially digital video cameras.
At present, the most contact is the programming control of the image acquisition card, and the programming method for image acquisition using the second type of image acquisition device is rarely introduced. Therefore, this paper focuses on the programming process of image acquisition using the second type of image acquisition device based on 1394 interface under VC++ platform.
1 hardware assembly and development platform of image acquisition system The hardware components of image acquisition in this paper: industrial digital camera, 1394b card and PC. Install the 1394b card required by the system on the spare PCI slot of the PC host, install the driver on the PC through the 1394 interface, and the hardware environment required by the system is completed.
When using the system platform Windows 2000, the development environment is Microsoft VC++6.0.
2 image acquisition implementation
The main content of the image acquisition system includes: human-computer interaction interface, receiving image signals from CCD camera and saving, image display on the acquisition interface and control of the camera. They will be explained one by one below.
2.1 Establishing the Acquisition Interface For the collection interface, you can create a dialog box or a document structure. This article uses the latter:
1) Generate an MFC AppWizard (exe) multi-document application framework (application name: PictureTest).
2) Connect the camera's dynamic link library (because you want to control the camera capture, the camera's library functions are used). Find the directory file installed by the camera, add the file path of the include folder to the edit box of Project->Setting->C/C++->;preprocessor->Additional include directories; add the file path of the lib folder to Project- In the edit box of >Setting->Link->Input->Additional library path, enter pgrflycapture.lib pgrflycapturegui.lib in the ...->Input->Object/library modules edit box.
3) A header file containing the camera control class, and a header file is added to the CPictureTestDoc.h file in the project:
#include
#include
And define common variables:
FlyCaptureContext context; //Camera function handle
CameraGUIContext m_guicontext; / / graphical user interface (GUI) handle
4) When taking pictures with the camera, you need to initialize it first. This part of the work we want to do is done by the system itself when the application is opened. Initialize the camera in the CPictureTestDoc.cpp file in the project:
First, initialize the defined function handle in the constructor:
Context=NULL; //Camera function handle initialization m_guicontext=NULL; //Image user interface handle initialization Then, connect the camera in the OnNewDocument() function and initialize it:
flycaptureCreateContext( &context );//Connect camera guierror=pgrcamguiCreateContext( &m_guicontext );//Create GUI connection flycaptureInitialize( context, _CAMERA_INDEX );//Camera initialization
2.2 Image Grasping In some automated systems, the capture code may be used in multiple places, so to enhance the readability of the program and reduce the programming code, we write a function function to complete the capture and save function. Call the function directly when needed. Add the function function PictureGrab() to the CPictureTestDoc.cpp file and use it to implement image capture. The core code is as follows:
flycaptureStart( context,
FLYCAPTURE_VIDEOMODE_ANY,
FLYCAPTURE_FRAMERATE_ANY ); / / camera is turned on, three parameters are: camera function handle, video mode, frame rate
flycaptureGrabImage2( context, &image );//Grab image, image is the address of the image stored in memory flycaptureConvertImage( context, &image, &imageConverted ); / / image format conversion, imageConverted is the address of the converted image in memory
flycaptureSaveImage(context,&imageConverted,("TestPicture.bmp"),SAVE_FORMAT_C );//Save image, TestPicture.bmp saves the name for the image, SAVE_FORMAT_C is the image save format, ie BMP format
flycaptureStop( context );//Stop the image captured by the camera through the above program and save it in the project folder, so that in the subsequent image processing, the image file can be accessed directly in the program by the file name without adding The path simplifies the program code.
2.3 Image Display There are two types of Windows bitmaps: DDB and DIB. The former depends on the device (Device Dependent Bitmap), which corresponds to the CBitmap class in MFC 6.0. Their structure and location in memory depends on the device driver that manages them. DIB is a "format" that can be stored in memory or stored as a file, a common BMP file. In Visual C++ MFC, the CBitmap class represents DDB images, which greatly facilitates the use of DDB by programmers. However, in general, no one will store the DDB image as a file, so we use more DIB. Unfortunately, MFC's support for DIB is almost no, so it is necessary to design the image processing program. The reusable CDib is designed to handle DIB [4] (for CDib, readers can refer to the relevant bibliography, this article will not be repeated). In this paper, in order to facilitate subsequent image processing, CDib-like technology is used in image display. Because in practice, we often need continuous reading of images, so this article directly uses the file name to read in the image, so that the captured image can be displayed in real time.
First, define the class CDib and define the common variables in CPictureTestDoc.h:
CDib m_dib; / / CDib class object, used for reading and writing bitmap files Then, add a function function in the CPictureTestDoc.cpp file: PictureRead (), add code in it:
CString strPathName;
strPathName = _T("TestPicture.bmp");
If (m_dib.Read(strPathName) == TRUE)
{
SetModifiedFlag(FALSE); // start off with unmodified
Return ;
}
And in the OnDraw (CDC* pDC) function in the CPictureTestView.cpp file, add the following code:
CPictureTestDoc* pDoc = GetDocument();
CDib *pDib=pDoc->GetPDib();//returns the pointer to m_dib
CSize sizeFileDib = pDib->GetDimensions();//Get the size of the DIB
pDib->Draw(pDC, CPoint(0, 0), sizeFileDib); //Show DIB
Set the scroll window in the OnInitialUpdate() function:
CDib *pDib=pDoc->GetPDib();//Get pointer to DIB
If(pDib!=NULL)
SetScrollSizes(MM_TEXT, pDib->GetDimensions());//Set the window size according to the DIB size. Finally, add the image acquisition command menu. The response function is:
Void CPictureTestView::OnTestStart()
{
CPictureTestDoc * pDoc = GetDocument();
pDoc->;pictureGrab ();//Grab diagram pDoc->;pictureRead();//Read image into memory OnInitialUpdate();//Set scroll window}
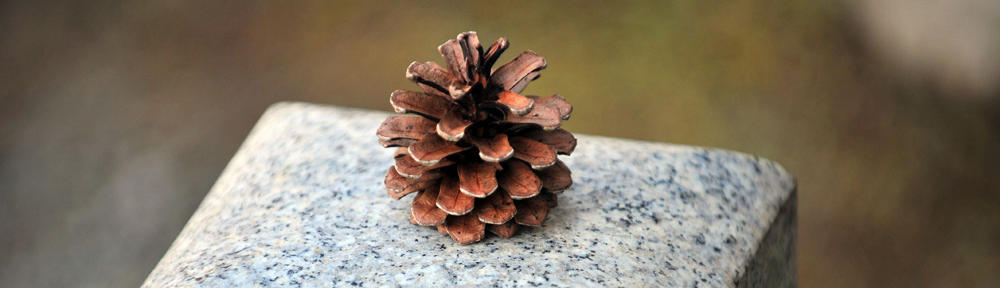
After compiling, click the image acquisition command to get the image in real time.
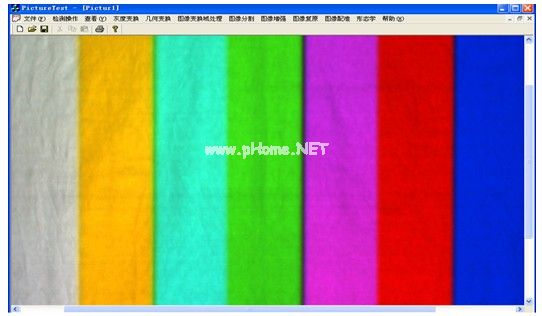
Figure 1 Image acquisition example
Fig.1 The example of image acquisition
Fig.1 The example of image acquisition
2.4 Camera Settings In image acquisition, we often need to set camera parameters such as image format, resolution, frame rate, etc. At the same time, in order to obtain high-quality images, we also need to make white balance adjustment. Of course, the setting of these parameters can be implemented by the code when the camera is initialized. However, in practical applications, in order to achieve the best results, we need to debug several times to achieve. If the method of modifying the code is adopted, the debugging process will be very troublesome. . Digital cameras generally have a setup menu. What we need to do is to call the camera's setup menu via code. After setting the parameters, the parameters are automatically saved and loaded. This will make it a lot easier to debug. Create a camera setup menu command whose response function is as follows:
Void CPictureTestDoc::OnTestCameraset()
{
pgrcamguiToggleSettingsWindowState(
M_guicontext, AfxGetApp()->m_pMainWnd->GetSafeHwnd() );//Camera Settings Dialog}
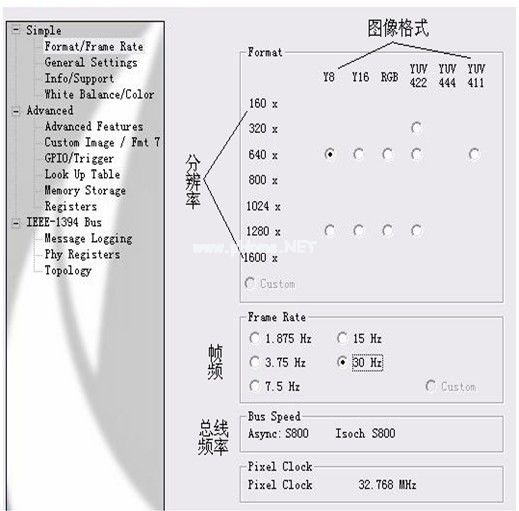
Figure 2 camera parameter setting interface
Fig.2 Fig. 4.2 Interface for setting the parameter of the camera
Fig.2 Fig. 4.2 Interface for setting the parameter of the camera
3 Conclusion The image acquisition system realized in this paper can set the format/mode/frame rate of the digital machine through the 1394 interface, set the optical parameters, collect the real-time display of the picture, and automatically control the camera. The system is stable and reliable. It can complete the real-time continuous image acquisition process in some complex projects, such as the automatic identification management system of highway vehicles and license plates, and the product packaging inspection system in industrial production, which has great practicality.
The grease gun can help significantly in the factory or garage. This tool makes it easy to apply lubricant on surfaces that need it. There are generally three types, including two hand powered designs and an air powered design. Also consider looking into adding a Fuji grease gun, Panasonic Grease gun, MG70 grease gun, 400G double Used grease gun, and grease gun accessories to your toolbox.
We also offer SMT lubricants, our teams have rich experience in SMT technology for several years.
Our worker have special way for equipment maintenance, know what brand of lubricating oil can used in which device, to make device optimum working.Our products are: THK, NSK, TCS, Kluber, Panasonic, Daphne, Jiekaisen, Eneos, Biral, ThereBond, Mobil, Shell and so on.
Smt Grease Gun,Smt Grease Gun Thk Mg70,3Oz Air Grease Gun,Smt Grease Gun N5008A
Guangdong Juguangheng Automation Equipment Co.,Ltd. , http://www.smtsupplier.net