
PhotoShop image processing experiment
1. The purpose of the experiment1. Understand the concept of image processing;
2. Understand the effects of image processing methods;
3. Learn to use Photoshop for flat image processing.
2. Experimental preparation knowledgePlease refer to the appendix
3. Experimental requirements(Please read the appendix carefully before starting the experiment)
1. Learn to use open files and save files in a more elaborate picture from the top and bottom of the network. PhotoShop supports many image formats. Among them, * .PSD is a special format for PhotoShop. Files saved in this format can be modified again. If it is saved in another compressed format (for example: JPG), it cannot be modified again (for example: the layer information is lost, etc.). During the experiment, you can compare the difference in file size after the same image is saved in different image formats.
2. Use PhotoShop to modify the basic parameters of the downloaded image (image size, color, brightness, etc.)
3. Use PhotoShop to process the downloaded image layer
4. Use PhotoShop to artistically process the downloaded images (for example: add lighting effects, partially process the images into grayscale images, etc.)
Four, thinking questions1. What is the role of layers in PhotoShop, for example?
2. What is digital image processing? What do you know about digital image processing?
3. Images can be divided into two categories: bitmaps and vector graphics. Briefly introduce the difference between bitmap and vector diagram in image storage and image processing?
Appendix Introduction to Photoshop Features
In the program menu, you can see the Photoshop icon, and then open the Photoshop program, the resulting interface is shown below: 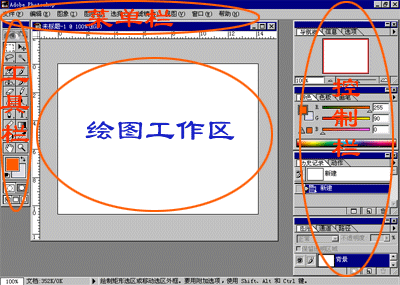
It can be seen from the above figure that Phtooshop mainly includes three operation windows: toolbar, menu bar, and control bar. Some commonly used operation tools are exemplified in the toolbar. The menu bar contains most Photoshop operation functions. In addition, the control bar Mainly control the relevant characteristics of the tools in the toolbar, in addition control the image layers and so on. All these combinations of functions can produce very wonderful Photoshop images.
1. Basic image processing functions
In this part, learn the functions of the "Image" menu by operating on the computer.

1. Modify and view the geometric parameters of the image:
Download this image, open it in Photoshop, and then open the "Image Size" in the "Image" drop-down menu to view the size of the image. You can also modify the size of the image in the pop-up dialog box (modify the resolution of the image). "Rotate Canvas" can rotate the image.
2. View and modify the image color model
There are many function options under the "Mode" submenu in the "Image" menu. Experiment one by one, and correspond each function option to the various color models we encountered during the class.
3. Change the image color and brightness related information
There are many function options under the "Adjustment" submenu in the "Image" menu, and test the effect one by one. One by one with various color space models.
2. Advanced image processing functions

1. Create a new layer
Download this picture, open it in Photoshop, select the appropriate "Marquee Tool" in the toolbar to select a specific area on the image (if you need to select an irregular area, you can use the "Marquee Tool" in the toolbar "Lasso tool" below), and then right-click on the selected area to see the pop-up menu shown below, select "Layer through cut", this will place the selected area in another Layer (a new layer created automatically).
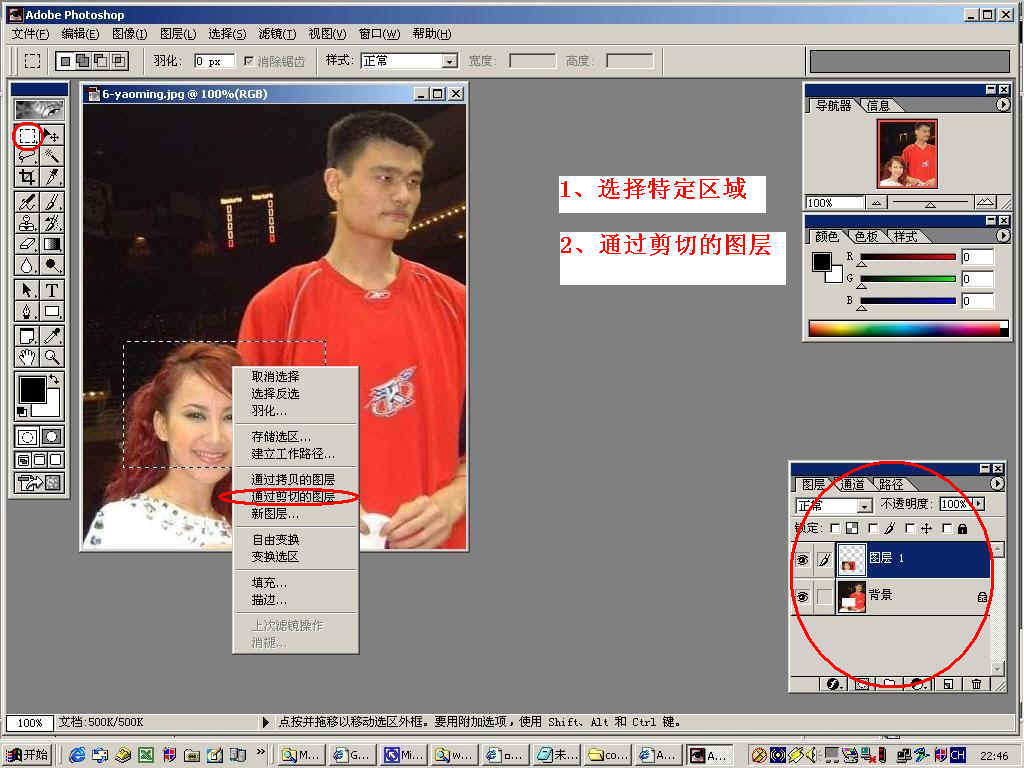
Information about the current layer will be displayed in the layer window in the lower right corner of the screen. As shown in the figure above, click the mouse to select the currently working layer. The current working layer will be highlighted in blue.
Of course, you can also create a new layer by creating a new layer in the "Layer" menu.
2. Modify the images of different layers
Change the image in "Layer 1" shown above (for example: decolorize, change color, move, etc.). When modifying a specific layer, it will not affect other layers, which is the benefit of the layer. In actual application, you can make a separate layer for additional information such as text (for example, when making a web page), when the text part needs to be modified, only need to change the layer where the text part is located without redesigning the entire The picture is very convenient. Please use the layer function when you are on the computer.
Third, the use of filter effects
Filters are a series of predetermined image processing schemes in PhotoSHop. Experiment with each option in the "Filter" menu to see the effects of various filters.
Guangzhou Ehang Electronic Co., Ltd. , https://www.ehangmobile.com